Showing posts with label weekend. Show all posts

Sunday, November 18, 2012

Two Years

So I just found out that today is my two year blogiversary!!! Wow! I can't believe it!!!!

I've definitely had times where I posted more than others....I've switched from wordpress to blogspot.....joined the daring bakers (!!)...the entire blog has changed and grown so much in the past two years that it is almost as if this weren't even the same blog. I've grown up some, and have learned a lot!

I may not have the biggest and definitely not the best blog ever, but I have loved the experience and "meeting" several people through the blog world!!! To celebrate my two years of blogging, here's a yummy smoothie recipe that I've been working on! I was inspired when I saw a post somewhere a while back on an orange push up smoothie, and adapted it to fit what is available here!!

Creamsicle Smoothie (makes two or three smaller smoothies...or one really huge one!)

Ingredients:

  • 200g frozen citrus juice concentrate (ours comes in little pouches of 100 grams each...I used tangerine, though orange, mango or anything like that would work)
  • 2/3-1 cup milk (depending on the consistency you want your smoothie)
  • 1/3 cup sugar 
  • 1/2 to 1 cup ice
Directions:
  1. Combine your frozen concentrate, milk and sugar in a blender. 
  2. Blend until fairly smooth and the sugar has dissolved.
  3. Add ice and blend until smooth.
  4. Pour into glasses and enjoy!!!! 

Saturday, October 27, 2012

Daring Bakers October....Mille Feuille!

Hello!!


Hope everyone is having a nice Saturday so far! If you remember, a couple of months ago I said that I had joined the Daring Bakers club and made the cappuccino eclairs. Well, I haven't been able to do any challenges since then, so when I read what this month's challenge would be, I absolutely had to do it!! We're making mille feuille, also known as napoleons or custard slices, which are basically layers of puff pastry, custard, and an icing.

  Our October 2012 Daring Bakers’ challenge was hosted by Suz of Serenely Full.
Suz challenged us to not only tackle buttery and flaky puff pastry, but then take it step further and
create a sinfully delicious Mille Feuille dessert with it!

Well, since I'd never made puff pastry or anything like this before, I didn't want to stray too far from the traditional dessert, but instead of a regular vanilla creme patisserie, I decided to incorporate a local fruit that is in season right now, the delicious passionfruit! I got three of the fresh fruit, boiled them with the milk and sugar for the creme, and then strained out the seeds to make a delicious, beautiful creme patisserie! Here's my full recipe:


Passion Fruit Mille Feuille

For the pastry:

  • 1 3/4 cup flour
  • 1 tsp salt
  • 1/4 cup cold butter, cubed
  • 1/2 cup plus 2 tablespoons cold water 
        beurrage:
  •     14 tablespoons room temp butter
  • 3 1/4 tablespoons flour
Pastry Directions:
  1. Cut the 1/4 cup of butter in to the 1 3/4 cups of flour and salt until the mixture resembles dry crumbs. 
  2. Add the water to this mixture, kneading on a lightly floured surface for about three minutes or until the dough is smooth.
  3. Chill the dough for 30 minutes. 
  4. While the dough is chilling, combine the room temp butter with the small amount of flour. Place between two sheets of plastic wrap and work into a 4in square. Chill for 10-15 minutes until the butter slightly firms up. 
  5. Roll the chilled dough into a 6 inch square, place the beurrage in the middle, with each corner of the beurrage touching the center of one of the sides of the dough. Fold the corners of the dough over the beurrage and seal the edges. 
  6. On a well-floured surface, roll the dough until it is a rectangle with about 1/4 in in thickness. Fold the right side towards the middle, and the left side over that, so you have a thin rectangle with three layers. Repeat the folding process, wrap in plastic wrap, and chill for thirty minutes. 
  7. Do two more folds and chill for 30 minutes.
  8. Do the final two folds and chill until needed. (Note: If your kitchen is really warm, like mine, you might want to just do one fold at a time and refrigerate)
For the Pastry Cream:
  • 2 cups milk
  • 1/4 cup cornstarch
  • 1 cup sugar
  • 3 whole passionfruit
  • 3 egg yolks
  • 2 whole eggs
  • 1/4 cup butter, cubed
  • 1 teaspoon vanilla extract
Pastry Cream Directions:
  1. Combine 1/2 cup of the milk with the cornstarch, whisk until fully incorporated.
  2. In a medium sized pot, combine the rest of the milk, the sugar and the pulp of the passionfruit (including the seeds!). Bring to a boil, remove from heat, pour mixture through a strainer to remove seeds and set aside. 
  3. Add yolks and then the whole eggs to the milk/cornstarch mixture, whisk to combine. Pour in about 1/3 of the warm milk mixture, always whisking in order to prevent the eggs from cooking. 
  4. Bring the remaining milk back to a boil, add egg mixture, whisking as you pour. Cook, whisking constantly, over medium heat until it thickens. 
  5. Beat in the butter and vanilla until incorporated, whisk until cream is smooth.
  6. Pour into a bowl, place plastic wrap on the surface of the cream to prevent a skin from forming, and refrigerate overnight so that the cream will thicken. 
For the chocolate sauce:
  • 1 cup milk
  • 2 tablespoons butter
  • 1/2 teaspoon vanilla
  • 1 cup sugar
  • 8 tablespoons cocoa powder
  • 2 tablespoons flour
Directions:
  1. Heat milk, butter and vanilla in a medium pot. 
  2. Combine sugar, cocoa and flour, and when the butter melts, add the dry ingredients to the pot. 
  3. Stir constantly until the mixture thickens, about 5 minutes. 
Making the Mille Feuille:
  • 1 batch pastry dough
  • 1 batch pastry cream
  • 1 batch fudge sauce
  • 2 cups icing sugar 
  • 2 egg whites
  • 2 teaspoons lemon juice
Directions:

  1. Roll the dough out into a 12x18 in rectangle and cut into 3 equal parts. 
  2. Place one of the sections on a piece of parchment paper and refrigerate the other two, place paper on a baking sheet, top with another piece of parchment and a pyrex dish. 
  3. Bake at 400 or about 15 minutes, remove the pyrex and top layer of parchment, bake 10 more minutes or until dough browns. Repeat for the other two sections. 
  4. Once the pastry has cooled, place one sheet on a flat board or dish, spread with half of your chilled pastry cream, place another sheet on top of that, top with remaining cream. Place the last sheet of dough on the top of everything, place in the fridge. 
  5. While the pastry is chilling, make the royal icing. Whisk the whites and the lemon juice until frothy, stir in the sugar. It should be thick enough to make trails across the surface. If not, whisk in a bit more sugar. 
  6. Remove pastry from fridge, pour glaze on it. Immediately drizzle the chocolate sauce over the top and refrigerate for a couple of hours so that everything sets. 


Monday, June 11, 2012

Checking In

Morning everyone! I can't believe how long it has been since I last posted! I know that a couple of weeks ago I wrote about wanting to post only when I felt like I had something to actually talk about, and really, this past week, I was focusing on relaxing and hanging out with the family (we had a four day weekend!) and not on writing. Gotta say, it did feel nice to just "check out" for a bit and have fun.

Anyway, I have a couple of things that I do want to talk about today....so here we go!
First of all, over this past week, I have discovered the easiest chocolate dessert ever. It literally takes five minutes. It is called brigadeiro de colher, and is basically chocolate with the consistency of a dulce de leche! So, so good! :D Here's the recipe for ya:

Brigadeiro de Colher
\

Ingredients:
  • 1 can sweetened condensed milk
  • 2 heaping tablespoons sweetened cocoa powder (like for chocolate milk or something)
  • 1/2 tablespoon butter
Directions:
  1. Place all ingredients in a microwave-safe bowl. Stir to combine.
  2. Microwave for two minutes, checking to make sure it doesn't boil over. When time is done, take the bowl out and stir the ingredients for a little while to cool them down. Repeat once.
  3. Microwave for one minute. Remove bowl from microwave, stir again. The mixture should be fairly thick, and it will thicken more as it cools. Eat by itself or with vanilla wafers, fruit, etc!
If anyone tries this out, let me know what you think!!!!!

Now, I do want to talk a bit about something that I haven't brought up in a while....my workouts. I've really changed up my routine and have tried out some new workout styles. I still run and definitely still go to spin class, but I've also been incorporating more bodyrock type workouts.....more intense bodyweight circuit training. In the past couple of weeks, I have done more pushups than I thought I would ever do! :D hahaha I've definitely noticed an increase in strength, which is pretty cool. I'm still trying to find the right balance for me, personally. I noticed last week that I got a little burned out....I ended up taking Thursday off because I was just too tired to work out. So, my exercise routine is a work in progress, but it has definitely changed over the past few weeks. 

Soo, what did you do this weekend?
See ya'll later!


Monday, April 23, 2012

Apple Braid

Good morning!! How did your weekend go? Ours was nice....extremely quiet but very nice!

Last night, my sister and I decided to bake our version of this apple braid that I had seen a while back. We changed up a couple of things, and for some reason ours didn't stay braided, but everyone really liked it and we're definitely planning on making it again!!! :D Here's what we did:
Apple Braid
Ingredients:
For the apple filling:

  • 3-4 apples (3 medium or 4 small)
  • 4 tablespoons sugar
  • 2 teaspoons cinnamon
  • 2 teaspoons lemon juice
For the bread:
  • 2 1/2 cups flour, plus more for dusting
  • 1/3 cup sugar
  • 1 tablespoon instant yeast
  • 3/4 teaspoon salt
  • 1 cup warm water
  • 2 1/4 teaspoons oil
  • 1/2 teaspoon vanilla extract
For the glaze:
  • 1/3 cup sugar 
  • 3 tablespoons heavy cream
  • 3/4 teaspoon vanilla extract
  • pinch salt
Directions:
For the apples:
  1. Peel and core apples. Cut them into thin slices and then cut the slices in half. Toss with the sugar, cinnamon and lemon juice, place in a buttered dish and bake for 15 minutes at 350. 
For the bread:
  1. While the apples are baking, combine all of the dry ingredients for the bread in a large bowl. Stir in the water, oil and vanilla. Mix until smooth, adding more flour if dough seems too sticky. 
  2. Turn out onto a floured surface, knead a couple of times to make the dough smooth again. Roll out to a rectangle about 12 inches long and 6 inches wide. Transfer dough to a greased baking sheet.
  3. Using a sharp knife, cut strips 1 inch thick along both sides of the rectangle, leaving about 1/3 of the dough in the middle uncut. Spread the apples down the middle section of the dough. 
  4. To braid, fold strips of dough into the center, alternating sides. When you reach the end, pinch seams to seal. Bake at 350 for 25 minutes or until the bread is golden brown. For more information on how to braid the bread, click here.
For the glaze:

  1. While the bread is in the oven, make your glaze, by combining all of the ingredients in a small saucepan. Heat until simmering and cook until it thickens, about 2 minutes. If after 2 min, it still seems thin to you, add more sugar by the tablespoon, while cooking the mixture over low heat until the glaze is the right consistency for you. When the bread is done, brush the glaze over the top and serve! 

So there ya have it....our version of the apple braid!!!!! :D It was sooooo yummy!!!!! The apples tasted like pie filling and the bread was really awesome too!!! The main difference in our version was that we used a little more sugar than in the original, because our apples aren't too sweet and we also really like sweet stuff! :D Also, the glaze was completely different but that's only because I didn't happen to have any confectioner's sugar on hand so I had to make a warm glaze. It turned out nicely, though! 

Well, I'm hoping that my slice of apple braid this morning will fuel me through some school work.....only two more weeks left! whohoo!! What are you up to today????

See ya'll later! 

Monday, April 2, 2012

Good to be Back

Morning everyone!!!!!
How did ya'll's weekends go? Mine was pretty great! Yesterday we visited a new church and had a nice time meeting new people!
So I was a little bit absent from the blog world last week.....just been really busy with school and stuff...plus I actually didn't have any new recipes/workouts to share. Sometimes it helps me to have a little something like  that to get me going on a post and then I just sort of go off on tangents from there. :D
Anyway, I do happen to have a recipe for ya today...the world's easiest cake! It is plain though, so you can either frost it and serve as a dessert, or do what I did and leave it plain and serve with jelly, honey, butter, etc for breakfast! Anyway, I do want to warn you that the texture of this is not a traditional "cake" as it is actually a brazilian recipe and I got my basic recipe from here. Because of the condensed milk in the cake, it is almost like a flan consistency but with flour, if that makes any sense at all. Also, the batter is very thin.....I was pretty worried when I first put it in the oven, but it does bake nicely!

Condensed Milk Cake
Ingredients:

  • 1 can (14 oz) sweetened condensed milk
  • 2/3 cup + 3 T flour
  • 1/2 tablespoon baking powder
  • 1/2 teaspoon vanilla extract
  • 4 eggs 
  • 3 1/2 tablespoons butter, melted
Directions:
  1. Preheat your oven to 350. Butter a 9x9 baking pan, set aside. 
  2. In a large bowl, combine all the ingredients. Beat very well until there are no lumps in the batter and everything has been incorporated. 
  3. Pour batter (once it again, it should be runny!) into the prepared pan. Bake for 22-28 minutes or until the cake tests done with a toothpick. 
  4. Remove from oven, let cool. Top with powdered sugar, frosting, more condensed milk, jelly, butter, etc! :D 
This was a seriously easy cake to make! Like I said before, the texture is a little bit different, so for that reason I don't think I'll make this all the time, but for a treat every once in a while, it is nice! I even made a lemon curd this morning to go along with it (I woke up at 5:30 today for no reason and I bake when bored). It was actually my first time having lemon curd, and I loved it!!!! I'm already thinking about the other citrus flavors I could use in the recipe! :D 

Easter is less than a week away. It is such an important time of the year. Not only is it a time to spend with friends and family, for Christians, it is also a time to remember Christ's death for us and His resurrection .  
It is a special time, and  I am definitely looking forward to having some quiet family time later on this week. Do you have any Easter plans? 

Well, that's about  it for today......

What are you up to this week? 

Friday, March 23, 2012

Very Special Day

Morning!!
Today is a veeery special day in this house! It is my sister's birthday!!!!!! After school, she and her best friend are coming here for dinner and then the two of them, my mom and I will go to the premiere of The Hunger Games later on tonight! Then tomorrow, we're going to have a little bit of a family celebration! So, so excited!!!! :D

Well, in other news, I have a yummy breakfast recipe to share with you guys today! It is another coffee cake....this time with chocolate!

Chocolate Swirl Coffee Cake

Ingredients:
  • 3/4 cup sugar
  • 1/2 cup butter
  • 2 eggs
  • 1 1/2 cups flour
  • 2 teaspoons baking powder
  • 2/3 cup milk
  • 1/2 teaspoon vanilla extract
  • 1/2 cup cocoa powder
  • 3 T sugar (only if cocoa is unsweetened)
Directions:
  1. Preheat oven to 350. 
  2. In a large bowl, cream together butter and sugar until fluffy. Add eggs one at a time, beating after each addition. 
  3. In a medium bowl, combine flour and baking powder. In another bowl, combine milk and vanilla. 
  4. Add about 1/3 of the flour mixture to the butter/sugar mixture, then add about 1/3 of the milk to that. Continue alternating between adding flour and milk to the butter mixture until everything is incorporated. 
  5. Combine cocoa and sugar. In a greased 9x9x2 pan, pour about 1/3 of the batter. Sprinkle about 1/2 of the cocoa mixture on top of the batter. Spread another 1/3 of the batter on top, sprinkle on the rest of the cocoa, finish with the remaining batter. Bake for 25-30 minutes or until the cake tests done with a toothpick.
We all liked this cake because the cocoa isn't to sweet and balances out the cake very nicely. Also, the cake itself was very easy to assemble and was pretty, too! Gotta love cute food! :D 

I don't think that I've got too much going on today....school, spin and Hunger Games is pretty much it, I believe! SO glad that today is Friday!!! I'm definitely looking forward to the weekend! What do you have going on this weekend? Tomorrow we're going to watch the Memphis Grizzlies game here at home and celebrate my sister's birthday some more! Speaking of her birthday, check out what I made her (it was her idea originally) last night:
A homemade gummy!! I googled the recipe and combined a couple to make this! Anyone who knows my sister knows that she LOVES gummy anything, and so I made her one with her favorite fruit flavor (passion fruit)! It was actually super easy and took about 30 minutes start to finish, so if anyone wants to make gummies, let me know! :D

Well, that's about it for today....see ya'll later! 


Monday, March 12, 2012

Chocolate Chip Cream Muffins

Good morning! How is everyone today????

I have never really liked Mondays very much......I mean who wants to go back to school/work after a nice, relaxing weekend? I know I don't! That's one of the reasons that I like to bake on Mondays......having something special for breakfast just puts me in a much better mood!
Something special like these muffins. Now I'm pretty sure that everyone who has ever had a muffin has either seen or eaten a chocolate chip muffin. Nothing new in that respect. However, I made these using my new favorite muffin base that I first tried out a couple of months ago with some mango cream muffins (recipe on the recipe page!). Before that, I had never baked muffins with cream in them......scones, yes, but not anything else. So, when I had some chocolate chips to use up, I decided to "wing it" and see if the cream base worked well with other muffin flavors. It did. :D

Chocolate Chip Cream Muffins
Ingredients:
  • 1 3/4 cups flour
  • 2 teaspoons baking powder
  • 1/2 teaspoon salt
  • 3/4 cup sugar
  • 8 tablespoons butter, melted or oil
  • 1/2 cup cream
  • 2 eggs
  • 1 teaspoon vanilla
  • about 1/2 to 3/4 cup chocolate chips....I just finished up a bag that we had opened already
Directions:
  1. Preheat your oven to 400 and grease 10 muffin tins.In a large bowl, combine flour, baking powder and salt. Set aside. 
  2. In another bowl, combine sugar, butter or oil, cream, eggs and vanilla. Stir until everything is combined. Add liquid ingredients to dry, mixing just until combined. Gently stir in the chocolate chips until they are more or less evenly distributed. 
  3. Spoon some of the batter into each of the tins, you will fill them about 2/3 of the way full. Bake for 20 minutes or until the muffins test done with a toothpick. 
  4. Serve with a glaze, butter or plain. Enjoy!!
As soon as my mom took a bite of these muffins she said that I had found one of the best muffin bases that she had ever had! So I'm thinking that I'll hold on to it! :D I've definitely got some more creative ideas floating around, but I wanted to see if the base would work with other ingredients before I got too crazy. 

So, in other news, my dad got home safely at about 1 AM Sunday morning. He was very tired but said that overall, he had a good trip. We were all glad that he was home......after having been gone for the better part of two weeks, it was really nice to spend all of yesterday hanging out! 

Recently, we got a box from some friends in the mail! Among other things, it had some movies in it! My mom, sister and I watched them all on Friday and Saturday, and last night, we rewatched one of them with my dad! We got The Help, Dolphin Tale and Midnight in Paris. I'm pretty sure that of the three, although we enjoyed them all, The Help and Dolphin Tale were our favorites. Both sad and sweet. We watched The Help with my dad last night and he enjoyed it as well. We're also already planning on watching the others with him soon!!!! Have you seen any good movies recently? If so, what were they? I loved the Help so much, that I've now got the book on my ereader!!! :D Already almost done, too!!!! I really think that they did a good job in adapting the book to the screenplay!!!! 

Well, that's about it for today....be back later on this week with some more fun stuff!! :D

Edited to add:
Musings of a Healthy Chocoholic just got a Twitter!!! Check it out: https://twitter.com/#!/GenniferDeLille


How was your weekend? 

Monday, March 5, 2012

Computer Scare

Good morning!!! How are ya'll today???? What did you do this weekend?

My parents got in safely yesterday and we spent most of the afternoon just hanging out. However, late Saturday night I had a little bit of a computer scare. I was online, facebook I think, and all of a sudden my internet closed, the screen went black and a BUNCH of error messages popped up saying things like my C drive had crashed, my RAM wasn't functioning properly, etc. Then, a couple of minutes later this popped up:

I don't know if you can tell, put in the top left corner, beside where it says "system check", there is a windows symbol. Well, when it showed  up, I lost access to everything on the computer: files, programs, even the start menu went empty. So I thought initially that something with my computer really had gone wrong, and because the System Check window looked like a windows program, I clicked on fix errors. Well, I was immediately taken to a page where I was asked to pay upwards of 80 dollars just to fix my computer. After that, I began to get a little suspicious. So, I shut the laptop off for the night, and the next morning, turned it on to find the same system check window opened. I then got on the other computer and found out that the whole thing is a virus that manages to block all your computer's files, making it look like you have lost everything on it and really do have a problem. It even blocks you actual antivirus program, so your computer doesn't even register that you have a problem. With the version that hit my computer, you can't even get online because your internet browser is hidden as well. My sister and I managed to connect my computer and the other one via remote access and she sent me a freeware called TrojanKiller that restores hidden files. After that, I just rebooted the laptop and everything was back to normal. It was really scary though and for a while I truly thought that I had lost everything on my laptop. Here's some more info about this virus, because it seems that more and more people are being affected by it:
System Check can really screw up the computer system it gets into. It’s because the program is one of those fake optimization tools whose aim is to trick the user rather than provide some real help. It can infiltrate your PC in a number of ways all of which are backdoor, which means you don’t have many chances to actually notice and prevent this even. As soon as System Check is on board, it executes the programmed sequence of actions, adding new files and changing your registry by creating new entries in there as well. This done, it will get launched each time Windows loads up because one of those new registry values keeps telling your machine to run the malware’s random executable during startup. When running, System Check will kind of scan your computer for errors and, not surprisingly at all, will find lots of those. It triggers bogus alerts like “Failed to save all the components for the file \System32\00004823″, “A potential disk failure may cause loss of files, applications and documents stored on the hard disk”, “Hard drive clusters are partly damaged” etc. These notifications are all part of the general campaign targeting the formation of a wrong impression on the user’s end. In the end of the day, this program always offers you some assistance by stating that it can fix all of those critical errors if you buy its full version. Now, do not even purchase this scam application. The only thing it can ‘repair’ is the bunch of imaginary issues it had made up in the first place. So be wise and get rid of this badware. (source)

 I realize that I'm sort of going on about this, but it is really sad to me how people actually spend a lot of time working on stuff like this just to trick others into paying them significant amounts of money.....and that they're so good at what they do that they can even fool a real antivirus program.

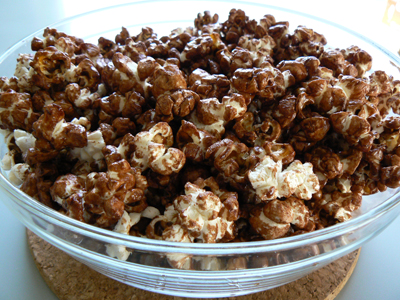
Anyway, if you stuck with me through all of that, you deserve a recipe! :D What I've got for ya today is some chocolate popcorn:
Chocolate Popcorn


Ingredients:

  • 1/3 cup popcorn kernels, unpopped
  • 1/4 cup plus 2 T sugar
  • 2 tablespoons corn syrup
  • 2 tablespoons cocoa powder
  • 1/4 cup butter
  • 1/2 teaspoon vanilla extract
Directions:
  1. Preheat oven to 250 degrees F and grease a cookie sheet.
  2. Pop the popcorn and set aside.
  3. In a medium saucepan, combine the sugar, corn syrup, cocoa and butter. Cook over medium-high until it comes to a boil. Continue boiling for about 2 minutes. Remove from heat. and stir in vanilla. Pour chocolate over the popcorn, stirring to coat all of it. Spread popcorn in an even layer on baking sheet.
  4. Bake for 30 minutes, stirring the popcorn every 10 minutes to prevent sticking and to make sure that all of the popcorn is coated. 
  5. Remove from oven, let cool. Break up any large clumps and store in an airtight container. 
Everyone really loves this popcorn! Easy and tasty!!!

Do you like sweet popcorn like caramel corn, or do you prefer salty versions??

That's about it for today...see ya'll later!!!!

Monday, February 27, 2012

A Different Kind of Week......

Good morning, everyone!!!! How was your weekend? Mine was good, but a little bit sad at the same time. My parents left (really, really early) this morning for the mission conference held at the "home base" for our mission agency here in Brazil. They'll be gone until Sunday,  so my sister and I will definitely miss them a LOT! We do have a friend staying with us, who we actually hadn't seen in a while,  so we're pretty excited to get to hang out with her some this week!

The poor cats are really confused....mom and dad left early, plus there is someone they have never seen before staying here. They are both super cuddly right now too....especially Katsa. She's "helping" me blog as we speak! :D Isn't she cute?


In other news, I made cookies this weekend!!!! They're cute and bite-sized and everything! :D Here's the recipe:
Chocolate Coconut Macaroon Cookie Sandwiches 
makes 15


Ingredients:
Cookies:

  • 60 grams powdered sugar
  • 30 grams dried coconut 
  • 1 egg white
  • 20 grams granulated sugar
Filling: (you'll only use about half of this filling, but it is really tasty so I'm giving you the full recipe :D)

  • 1/3 cup heavy cream
  • 3 oz chocolate, finely chopped (or sub 6 T cocoa +3 T oil)
  • 1-4 tablespoons sugar (depending on personal preference) 
  • 1 tablespoon butter
  • 1/2 teaspoon vanilla 
Directions:
  1. Toast the coconut in the microwave by first microwaving on high for about a minute, stirring and microwaving in 30 second increments until done. 
  2. Sift together the powdered sugar and the coconut into a small-medium bowl. Set aside.
  3. Beat the egg white in your mixer until foamy. Keep beating while slowly adding the granulated sugar to the white. Beat on high until stiff peaks form. 
  4. Fold about 1/4 of the egg white mixture into the coconut mixture. Keep folding in the rest of the egg white mixture until everything is combined. Your batter should be kind of thick but you should be able to pipe it out. 
  5. Pipe out 30 1/2 in circles onto a prepared baking sheet. Bake at 350 for 12-15 minutes or until macaroons are set. 
  6. While baking, prepare the filling. Combine the cream, chocolate and sugar in a pot. Heat over medium-low until the chocolate has melted and is smooth. Stir in the butter and the vanilla. 
  7. When the macaroons have cooled, gently remove from the baking sheet. Spread some of the filling on 15 of the macaroons, top with the other 15. 
So there ya have it! I love it when an experiment works out!!!! :D

I had better get studying.....see ya'll later!
Do you like experimenting in the kitchen or do you prefer to make tried and true recipes? 

Monday, February 20, 2012

Easy, Yummy Banana Bread

Good morning!!! How did your weekend go? Mine was pretty great......Saturday it was really rainy so we all stayed at home and hung out, and yesterday we went to the beach for the day with a friend.

So today I wanted to share a recipe with ya'll that my entire family loves! Now, I know that pretty much everyone already has a good banana bread recipe, but one of my favorite things about ours is that it doesn't require a mixer, and can be done from start to finish in just about an hour. Plus, the recipe itself doesn't dirty a whole lot of dishes....just a bowl for mixing up the batter and a loaf pan.
Easy, Yummy Banana Bread


Ingredients:

  • 2 cups flour
  • 1 teaspoon baking soda
  • 2 teaspoons baking powder
  • 1/4 teaspoon salt
  • 1/2 teaspoon cinnamon
  • 1/2 cup sugar
  • 1 egg
  • 1/2 cup milk
  • 6 tablespoons oil
  • 1 cup mashed bananas (about 2 medium bananas)
  • 1 teaspoon vanilla extract
Directions:
  1. In a large bowl, combine flour, baking soda, baking powder, salt, cinnamon and sugar.  Whisk until everything is evenly distributed. 
  2. Add the egg, milk, oil, bananas, and vanilla to the dry ingredients. Stir until fully combined. 
  3. Pour batter into a loaf pan lined with aluminum foil and lightly greased. Bake at 375 for 40-45 minutes or until the bread tests done with a toothpick. 
  4. Remove from oven, let cool. Store in a tightly closed container. Should last 2-3 days depending on the bananas used in the bread. Serve warm with butter. 
Easy, no? The cool thing about a recipe like this is that you can make it as is, or modify and add different elements to the bread like chocolate chips, coconut, some sort of glaze, etc. Do you like banana bread? 

Like I mentioned on Friday, this week is Carnaval. As a family, we don't celebrate it, but it is still nice to have some family time and just hang out for a few days. I still have some school to do, but besides that, there's not a whole lot going on around here. I'm going to take advantage of the fact that I'll have more free time and attempt some new recipes. My sister and I have been thinking about a couple different options that we want to do together while she is home. 

Well, that's about it for today...off to download this week's classes!
What are you up to this week? 

Friday, February 17, 2012

Happy Friday! :D

Yet another bad post title......I really need to work on my creativity. hahahaha

Anyway, Happy Friday, everyone! I'm so glad that today is Friday! This next week, a lot of brazilians will be celebrating Carnaval, which is basically my least favorite holiday ever. The people here go absolutely crazy! Anyway, we pretty much stay holed up in the apartment, so we are looking at 6 or so days of non stop family time! hahahaha
So Wednesday, I got a great new workout in and thought I'd share it with ya:

So, as you can see, this workout is pretty leg-heavy. Most of the exercises themselves are fairly simple, but the combination of the two exercises in each superset and doing each one 3 times through before a rest is killer!!! Also, if you want, you can definitely modify this by reducing or increasing reps, adding some cardio in there, etc! If anyone tries this out, let me know what you think!!!!

So today, I wanted to do something a little different than my typical posts, inspired by a lot of the blogs that I read. I'm going to post some of my favorite links from this past week. Interesting articles, yummy-looking recipes, tough workouts, etc. I'm hoping that by posting this stuff I'll actually remember to revisit the sites and actually try out the recipes/workouts/etc. Anyway, here's my first edition of Friday Favorite Links:


Um yum! Apparently this ends up with three layers....a crisp top, pudding-like middle and on the bottom, actual hot chocolate! Plus, there's only 4 ingredients!!!!!


  • Not an actual link....I just thought this was cute! :D 


  • A new circuit that I saw on  pinterest!


  • And finally another pinterest find that I really liked!


Aaad that's it for my first ever Friday Favorite Links! What did you think? 

Well, I should probably get going.....school and all that! What are your weekend plans?  I'm pretty sure that we're going to rent a bunch of movies and hibernate for the next few days! Also, which of these two recipes do you want to see first:
  • Mini Protein Muffins (the "healthy" option)
  • Super Easy Basic Banana Bread (a family favorite recipe!)
Oh and before I go, I just want to say something really quickly! I'm really, really excited about today because my mom is going to spin class with me!!!!! She's never been before, and I got the free pass for her on Monday, so I've been looking forward to this all week!!! :D

Now, I really am going....see ya'll later!

Monday, February 13, 2012

Lazy Weekend

Good morning everyone!!!!! I didn't post on Friday because really, not much has been going on and I didn't want to post just because it is what I usually do. Anyway, this weekend was a good one! Saturday we had an event with the ladies in the community....watching the movie August Rush. Have any of you ever seen it? It is pretty cute and very sweet!

Well, after we got home from being in the community, we pretty much didn't leave the house for the rest of the weekend! It was pretty nice, really. We ordered in chinese and didn't cook much of anything for the weekend. Also, we watched some fun tv shows and movies!!!! What did you do this weekend?

I do have a recipe for ya'll today...made just this morning! More muffins!!! hahahaha

Jelly Doughnut Muffins (makes 10)
(not my picture)

Ingredients:
  • 1 1/2 cups flour
  • 1/2 cup sugar
  • 2 teaspoons baking powder
  • 1/4 teaspoon salt
  • 1/4-1/2 teaspoon cinnamon
  • 1 egg, beaten
  • 1/2 cup milk
  • 1/3 cup oil
  • Jelly (I used my mom's homemade strawberry jam)
Directions:
  1. In a medium bowl, mix the flour, sugar, baking powder, salt and cinnamon together. 
  2. In another bowl, combine the egg, milk and oil, stirring until combined. Add wet ingredients to dry, stir just until everything is incorporated. 
  3. Fill 10 greased muffin tins halfway. Drop about a teaspoon of jelly in each tin. Spoon in enough of the remaining batter to fill the muffin tins about 3/4 of the way. 
  4. Bake at 400 for 20 minutes or until they test done with a toothpick. If you want top with a glaze. Serve with butter. 
These were really, really good. We just ate ours (literally about 15-20 minutes ago) and my dad actually said that he really liked them. That's saying a lot for someone who isn't huuuuuge on muffins. Also, I believe that the base recipe would be great for other muffins, because it is really light and fluffy! Do you have a go-to basic muffin that you add to to make different flavors, or do you use different muffin recipes for different muffins?  I usually do different recipes depending on the muffin, but I really think that I'll start using this base more often! 

Well, I had better go....
On today's agenda is school, gym, more school. 
What have you got going this week?


Friday, February 3, 2012

Summer Muffins

Morning everyone!! Can you believe that it is already Friday? I definitely can't....this week has flown by so fast!

First of all, I just wanted to thank ya'll for the awesome comments on my college post from a couple of days ago. I really need to start actively looking at schools pretty soon and am a little nervous about doing so from another continent!

Well, now I have that muffin recipe that I promised for you! I've made a similar flavored muffin here but the ingredients in these are slightly different and I actually think that I like them better. Also, the glaze, while not very healthy, absolutely makes these muffins! So good!

Lemon Coconut Muffins (again!)
makes 6 (can be doubled easily)


Ingredients:

  • 1 cup flour
  • 1/4 cup coconut
  • 1/4 cup oatmeal
  • 2 teaspoons baking powder
  • 2 tablespoons plus 2 teaspoons butter
  • 7 tablespoons sugar ( more or less....if you want them more tangy, use 5-6, or if you want them sweeter, use 8)
  • 1/2 egg, beaten
  • zest of 1 lemon
  • 1/2 cup milk
  • Coarse sugar for sprinkling on top of muffins
Glaze ingredients:
  • 1/4 cup sugar
  • 2 tablespoons lemon juice
  • 1 1/2 tablespoons water
  • zest of 1 lemon
Directions:
  1. For muffins, combine flour, coconut, oatmeal and baking powder in a medium sized bowl. 
  2. Cream butter and sugar together until light and fluffy, add egg and zest. Combine butter mixture and flour mixture, pour in milk. Stir just until everything is mixed together. 
  3. Fill 6 greased muffin tins. Sprinkle some coarse sugar or even some more coconut on top of each muffin. Bake at 375 for 18-20 minutes or until muffins test done. Note: This batter is pretty thick and not sticky at all, so it should be easily spooned into the muffin tins. 
  4. While muffins are baking, combine all of the glaze ingredients in a saucepan. Heat over medium until sugar has dissolved and glaze has boiled for a couple of minutes. Drizzle over finished muffins. 
These were seriously yummy muffins! I loved how the texture of the oatmeal and the texture of the coconut went really well together, so it wasn't too obvious that the oats were actually in the batter. So good and tasted like summertime! 

So besides baking muffins, my week has just been pretty filled with school-related stuff. I've got a couple of tests this week plus an essay, I think, so I've been pretty busy. I also have about a million (I never exaggerate...at all) random projects that I've started over the past couple of months and have yet to finish (I'm also not at all ADD). So, I'm planning on actually completing some of them....eventually. Are you bad about starting stuff and not finishing it, or do you typically complete all of your projects? 

Well, that's about it for today....gotta go study! haha

What have you got going this weekend?

Monday, January 23, 2012

Sometimes Ugly Food is the Best Food.

Good morning! How is everyone doing? Our weekend has been pretty rainy and ugly outside, but we had some good family time and visited a different church yesterday. What did you do this weekend? 


For school, this semester I am taking a course called Life Management Skills. Basically, it is supposed to teach high school students how to prepare themselves for college life and living a little more independently of their parents. This semester, we are covering cooking and preparing meals that are quick and easy to make. The funny thing is, I've been cooking for a while now, so some of the recipes in our class cookbook (which happens to have been designed for kids just learning to cook) are either things that I already knew how to make or just very simple. Either way, over this quarter, I will be making at least one thing from each section. Each week will tackle a different section of the cookbook: breakfast, lunch, dinner, snacks and dessert. Last week, we did breakfast. I read the recipes out to my family and asked them to choose one. The recipe that seemed most interesting was a hashbrown and scrambled egg pizza. Since we don't exactly get frozen hashbrowns here, I made some from scratch and modified the whole recipe a little bit to fit with what we have available here.

Breakfast Pizza
4 servings
(seriously crappy picture....eggs are not photogenic)
Ingredients:
  • 1 frozen pizza crust (a small sized crust is what we used...we just cut it into quarters and served it....no leftovers!)
  • 1 medium sized potato, cubed
  • Onion and green bell pepper (optional....can use as much or as little as you want)
  • 1/2-2/3 cup cheese, shredded
  • 4 eggs
  • 1/4-1/3 cup milk
  • 2 T butter, divided
  • salt and pepper to taste
  • bacon (optional)
Directions:
  1. Prepare the pizza crust according to package directions. Set aside.
  2. In a medium sized skillet, combine 1 T butter,  the potato, onion and bell pepper. Saute until the potatoes are tender. Season with salt and pepper. 
  3. In a bowl, beat eggs, milk, salt and pepper. In a large skillet, melt the other tablespoon of butter, cook the eggs until they are cooked through but still a little glossy. 
  4. If using bacon, fry up however much you want, crumble, and add to the potatoes. 
  5. Sprinkle half of the cheese on the crust. Pour the eggs, potatoes, and bacon on the cheese. Top with the remaining shredded cheese and bake at 375 for 8-10 minutes or until all the cheese is melted and the crust is cooked to your preference. 
This was actually pretty good!!! We had toast with homemade jelly (strawberry!) and fruit salad on the side. The bacon was definitely a good addition to the pizza, and we all liked how the dish took typical breakfast foods and served them in a non-traditional way. Personally, I think that it would be pretty awesome with some pepper jack cheese on it, but we don't have any here.....oh well.... :P

Oh and by the way, the above plate was my dad's. He arranged it and offered to let me take a picture of it for the blog!  Do you have any favorite non-traditional breakfast recipes?

That's about it for today....see ya'll later!


Friday, January 20, 2012

Gnocchi and Cookies

Happy Friday, everyone!!!! How have ya'll's weeks been???? What do ya'll have going on this weekend? I've had a pretty good week.....like I said Wednesday, mostly school. As for the weekend, as far as I know, we don't have much going on, which will be good for us all!

Besides school, I've been up to some ktitchen experiments this week!!! Wednesday, I made homemade gnocchi (so that is one more thing to check off my list!) and yesterday, I made some super easy peanut butter cookies (mainly just because I wanted some cookies and they required little effort....15 minutes to fresh cookies!). Here are the recipes for ya:

Homemade Gnocchi (based off of this recipe) 
 
(not my picture)

Ingredients:
  • 2 lb potatoes 
  • 3/4 teaspoon salt
  • dash of pepper
  • dash of oregano
  • 1 egg yolk
  • 1 cup flour (more if needed) 
Directions:
  1. Wash potatoes, pierce with a fork, and either bake at 400 for about 45 minutes, or microwave for about 15, flipping them after about 7 minutes. Once the potatoes are tender, let cool until they are easier to handle, about 15 minutes.
  2. Scoop the insides of the potatoes out of the skins and push through a potato ricer. Gather the potatoes into a mound on a well-floured counter, sprinkle with salt, pepper and oregano and let sit about 15 more minutes to cool off some more. 
  3. Pour the egg yolk on top of the potatoes and then sprinkle the cup of flour on top of it. Gently incorporate the yolk and flour into the potatoes, being careful not to overwork the dough. The gnocchi dough should be sticky, but if it is too sticky to handle, add more flour 1 tablespoon at a time. Pat out into a disc about 1 1/2 in thick and cut into 4 pieces. 
  4. Roll one piece out to make a 2 foot long "snake". Cut into pieces about 1/2-3/4 in in size. Repeat with the rest of the dough. 
  5. Bring a large pot of water to a gentle boil. Drop about 1/4 of the gnocchi into it. When the gnocchi floats, they are done. Remove with a slotted spoon and repeat with the rest of the dough. 

These were really yummy! I didn't saute them, but served them with a garlic cream sauce! So, so good! :D 
Nooow, for the cookies (most of you have probably already seen this recipe before...:D): 

Quick Peanut Butter Cookies (flourless)


Ingredients:

  • 1 cup of sugar
  • 1 cup of peanut butter
  • 1 egg
  • 1/4 tsp vanilla (optional)
Directions:
  1. Combine all ingredients in a medium sized bowl. 
  2. Drop by teaspoonfulls onto a baking sheet, flattening each cookie a little bit after you drop it. The dough doesn't spread very much while baking, so you can put the cookies close together. 
  3. Sprinkle each cookie with some sugar and bake at 350 for about 10 minutes. R
  4. Remove from oven and let cookies cool for about 5 minutes or until they firm up a little. 
Easy, no? I bet these would be great with dark chocolate dreams or nutella or something! 

Well, that's about it for today...I'm off to study for some tests! 

See ya'll later!

Monday, January 16, 2012

Cappuccino Muffins

Good morning!!! My weekend pretty much flew by! The concert on Friday was lots of fun, we just basically hung out on Saturday, and went to church + some more hanging out yesterday. What did your weekend look like?  Oh! and before I  forget, I made these on Saturday, and can I just say that they're awesome? Kind of a strange recipe, but so worth it! :D

Another thing I've made recently? Cappuccino muffins. They're pretty awesome, what with the whole cappuccino flavor going on plus melty chocolate chips, and a drizzle of glaze. We used a basic plain glaze, but I bet that making a cappuccino glaze would be awesome as well! Anyway, here's the recipe for ya:


Cappuccino Muffins 
(makes 6....I actually halved my typical muffin recipe just in case these didn't turn out)

Ingredients:

  • 1 cup flour
  • 1/4 plus 2 T sugar 
  • 1/2 teaspoon cinnamon
  • 1 1/4 teaspoons baking powder
  • 1/4 teaspoon salt
  • 1/2 cup milk
  • 1 T instant cappuccino mix (or you can just use instant coffee+some cocoa powder)
  • 1/4 cup oil
  • 1/2 egg (crack an egg, beat it, and pour about half of the liquid into the batter)\
  • 1/2 teaspoon vanilla extract
  • 1/4 + 2 T chocolate chips (I used semi sweet)
Directions:
  1. In a medium sized bowl, combine flour, sugar, cinnamon, baking powder and salt. 
  2. In another, small bowl, combine the milk and the cappuccino mix until it has dissolved. Add the oil, egg and vanilla. Add the wet ingredients to the dry, stirring until combined. 
  3. Fold the chocolate chips into the muffin batter
  4. Spoon into 6 greased muffin tins. This will fill them almost completely up, but the muffins rise really well. Bake at 375 for 17-20 minutes or until the muffins test done. 
Anyway, these were really yummy and a great way to start off the week! 


Well, that's about it for today.....I do have some school stuff to do! 
Do you like coffee/cappuccino flavored baked goods? 

Friday, January 13, 2012

Olive Garden Breadsticks and Fun Friday

Hey! SO glad today is Friday! :D My week went pretty well, especially for the first week back at school, but I'm definitely glad that it is almost the weekend. How was your week? 


So, I have a couple of things to share with ya'll today.....first up: a copycat recipe for Olive Garden Breadsticks!!! I originally saw the idea on Pinterest, but tweaked the recipe a little bit based on what we had here at home! They turned out really well, especially since we don't have an Olive Garden here! Personally, I think that these breadsticks would be awesome with some herbs in the dough, which would make them slightly different from the original version. Anyway, here ya go:

Olive Garden Breadsticks (based on this recipe)
(definitely not my picture..hahaha :D)
Ingredients:

  • 4 1/4 cups flour
  • 2 tablespoons butter, melted
  • 2 tablespoons sugar
  • 1 tablespoon salt
  • 1 1/2 cups warm water
  • 1 package active dry or instant yeast (I used instant because that's what we have here)
Garlic Topping (brush half on about 7 minutes into baking, and the other half after the breadsticks are done)
  • 1/4 cup butter, melted (I used some garlic butter that we already had, but regular is fine, too!)
  • 1/4 cup oil
  • 2-3 cloves garlic, crushed (or more or less, it really depends on personal preference)
  • 1 1/2 teaspoons salt
Instructions:
  1. If using active dry yeast: Dissolve sugar and yeast in warm water and let sit for 10 minutes. The mixture should look frothy. 
  2. In a large bowl, combine flour and salt. Add either the proofed yeast mixture (for active dry yeast) or just the yeast, water and sugar (for instant yeast) to the flour. Add the melted butter. Mix with a wooden spoon just until fully combined. 
  3. Knead dough just until smooth. Overworking the dough will cause the breadsticks not to turn out well, so be careful!
  4. Grease a cookie sheet. Separate the dough into 10-12 pieces. Roll into breadsticks. Cover and let rise in a warm place for 45 minutes to an hour. 
  5. Bake breadsticks at 400 degrees for 12-15 minutes. About halfway through baking, take the breadsticks out and brush with half of the garlic/butter/oil mixture. Place them back in the oven and bake until done to your preference. As soon as you take out the finished breadsticks, top with the rest of the garlic/oil/butter mixture.  Enjoy! :D
These were really delicious!!! And very close to the real deal! 

So I'm really excited about today! For the very first time, an American Christian singer, Michael W. Smith, is coming here to Recife!!!!!! My whole family, plus some of our friends, is going!!!! When we first heard that he was coming here, we all thought that it would be fun to go, but never actually considered going. Then, a few days later, some friends of ours mentioned it, and we all decided to go as a group! Fun stuff, huh? :D

What are you doing this weekend? Other than the concert, I don't think that we have a whole lot going on!


Monday, January 9, 2012

Buttermilk Doughnuts and the First Day of School

Mondays are, and have always been, my least favorite weekdays. Because really, who wants to go back to work/school after the two short, fun weekend days? But my least favorite Mondays have to be the ones that come right after vacation time. Which, is what today is for me. My very first day of school after a really fun break, and a really fun weekend. Blegh. :P hahaha

Anyway, like I said, this past weekend was pretty great! Some major family time occurred, and we all got to rest a  little bit! Also, I'm pretty sure that any weekend that includes homemade doughnuts is bound to be awesome. The best part about these is that there's no yeast in the recipe, so no waiting forever for the dough to rise!!!
Buttermilk Doughnuts (from this recipe)

Ingredients:
  • 3 1/2 cups flour
  • 3/4 cup sugar
  • 1/2 teaspoon baking soda
  • 2 teaspoons baking powder
  • 1 teaspoon salt
  • 1 teaspoon cinnamon
  • 2 eggs
  • 3/4 cup buttermilk
  • 1/4 cup sour cream (we don't actually get sour cream here, so I had to make some by adding vinegar to heavy cream...it really works!)
  • 1/4 cup butter, melted, browned, and cooled
  • Oil for frying
Glaze (this is just a guesstimate...I sort of made it up as I went along.....it turned out crackly though, sort of like a store-bought doughnut)
  • 3/4 cup sugar
  • 3 T milk
  • 2 T water
  • 1 t vanilla extract
  • 1/2 t oil (this will make the glaze shiny)
Combine glaze ingredients in a saucepan, heat until sugar has melted. Dip doughnuts into glaze after they've been fried.
Directions: 
  1. Whisk together the flour, sugar, baking soda, baking powder, salt and cinnamon in a large bowl. Set aside. 
  2. In a medium sized bowl, combine the eggs, buttermilk and sour cream until combined. Stir in the browned butter (can be only slightly browned or completely browned, depending on the flavor you want).
  3. Make a well in the flour mixture, pour the wet ingredients into it. Stir gently until a sticky dough has formed. 
  4. Turn the dough out onto a lightly floured surface, sprinkle some flour on the top of the dough, and pat out to about 1/2 in. thick. Get two different sized cookie cutters. Dip the largest in some flour, and cut out a doughnut. Cut out the doughnut hole by dipping the smaller cookie cutter in flour and cutting out the center of the doughnut. Continue until all the dough has been used up. I got about 10 doughnuts. Place in the fridge until ready to fry.
  5. In a deep skillet, heat a 1 - 1 1/2 in layer of oil until it reaches 365-370 degrees. When the oil is ready, take 2-3 doughnuts at a time and place them in the oil, turning after one side is browned. Each side should cook for about 2 minutes. Remove doughnuts, dip in glaze or cinnamon sugar. Enjoy! :D 
You know that I am having one of these today for a first-day-of-school snack! :D 

Speaking of school, I should probably start studying......look who will be helping me out today:
See ya'll later! 

What's your favorite kind of doughnut?


Monday, December 26, 2011

Rest.

Good morning!!! Hope everyone had a wonderful, blessed Christmas. Sorry about the lack of posting.....I really wanted to spend some quality time with the family! We definitely relaxed and hung out a lot this weekend and took yesterday to remember the true meaning of Christmas. What did you do this weekend?


In a completely unrelated note, I have a recipe, and also a topic that I have recently done some research on to talk about! First up, the recipe:
Super soft sugar cookies


(not my picture, but this is how they turned out)
based on this recipe

Ingredients:
Cookies:
1 cup butter
1 cup sugar
2 eggs, beaten
1 tablespoon vanilla extract
3 - 3 1/2 cups flour (I started out with 3 cups, but ended up needing to add some to the dough)
3 tsp baking powder
1/2 teaspoon salt
Frosting:
5 cups powdered sugar
1/3 cup butter, melted
1 tablespoon vanilla extract
8 tablespoons milk
Food coloring (I used green)

Directions:
  1. Beat butter, sugar, eggs and vanilla until fluffy.
  2. Combine all dry ingredients in another bowl and slowly add to the butter mixture until everything is well mixed. 
  3. Chill dough for at least an hour. 
  4. Separate dough into about 24 pieces, flatten each one into a thick circle. Place about 2 inches apart on a baking sheet. 
  5. Bake at 400 for 8-10 minutes. The cookies should be a very light golden color. If you overbake, they won't be as soft. 
  6. To frost, mix all of the frosting ingredients together and spread on cooled cookies. I also topped mine with some red colored sugar to make them even more Christmas-y!
These were seriously really delicious!!!! :D Sugar cookies are probably my third favorite cookie....the first being oatmeal raisin, and the second, chocolate chip. What is your favorite kind of cookie????

Now, just really quickly, I want to talk about something that I've noticed in myself for the last little while. 
I have this huuuuge craving for salt. I mean, I know I exercise regularly, which is one cause for salt cravings, but what I've been experiencing has been more than that. I'm still slightly underweight, so I did some research to see whether or not that has anything to do with massive salt cravings. What I found out, according to here and here, is that due to the fact that I have dealt with an eating disorder, my body's chemistry is pretty out of whack. A zinc deficiency can lead to a loss of appetite, and anorexia, or malnutrition can lead to a zinc deficiency, creating a cycle. In turn, this same zinc deficiency can cause all of the body's electrolytes to be out of balance, including sodium, causing massive salt cravings. Interesting, no? Anyway, I'm going to try adding more zinc-rich foods to my diet to see if that's the root problem or not. 

Well, that's about it for today....hope you all have awesome weeks! 


Monday, November 28, 2011

Baking with Chocolate

Morning everyone!!!!! Hope you all had awesome weekends! Saturday was extremely hectic around here, because we had a pre-Christmas party for some of the people that we work with in the community. I think we left our house at around 8:30 and got in at about 6 PM. It was really fun though!!! Yesterday, we actually had our Thanksgiving dinner because my dad wasn't home on Thursday. My mom, sister and I all worked together to cook up our meal. We had roast chicken (easier to find here), mashed potatoes, macaroni and cheese, homemade stuffing, corn, a veggie plate, and some rolls that I made. Everything was so, so good!!!! :D What did you do this weekend? 


So this morning I woke up early and felt like baking! I saw a recipe for chocolate banana muffins the other day, and decided to try those out!

Brownie-BottoM Banana Streusel Muffins

Ingredients:
Streusel:
  • 1/3 cup packed brown sugar
  • 2 tablespoons flour
  • 1/4 teaspoon cinnamon
  • 1 tablespoon butter
Muffins:
  • 1 1/2 cups flour
  • 1 teaspoon baking powder
  • 1 teaspoon baking soda
  • 1/2 teaspoon salt
  • 1/2 teaspoon cinnamon
  • 3 mashed ripe bananas
  • 1/3 cup oil
  • 1/2 cup sugar
  • 1/2 cup packed brown sugar
  • 1 egg
  • 1 teaspoon vanilla extract
  • 6 tablespoons cocoa powder
  • 1/4 cup boiling water
Instructions:
Streusel:
Combine flour, sugar and cinnamon in a small bowl. Cut in butter until mixture resembles coarse crumbs. 

Muffins:
  1. In a small bowl, stir together flour, baking powder, baking soda and salt. Set aside
  2. Mash or puree the bananas and set aside. 
  3. In a large bowl, combine the sugars and the oil. Add in the egg, beat until incorporated, stir in vanilla. 
  4. Add about 1/3 of the flour mixture to the wet ingredients, stir until incorporated. Stir in about half of the banana. Add another third of the flour mixture, stirring until fully combined. Pour in the rest of the bananas, and finally, stir in the last third of the flour mixture. 
  5. Separate the batter into two bowls, with about 1/4 cup more in one than in the other, add the cinnamon to the bowl with more batter in it. 
  6. In a small bowl, combine the cocoa with the boiling water and stir until it resembles melted chocolate chips. Add this to the bowl with less batter and stir until incorporated. 
  7. Grease 12-14 muffin cups, pour a tablespoon of the chocolate batter into the bottom of each one. Pour a tablespoon of the cinnamon batter on top of the chocolate. Sprinkle the streusel on each muffin. Bake at 350 for about 16 minutes or until completely done. 
These were soooo yummy!!! They didn't even really need a glaze! I made 12 HUGE muffins from this, because we only have two 6-cup muffin tins anyway, so you could probably get 14 normal sized muffins out of this. My sister even said that they were here favorite chocolate-y muffins that I have ever made! They are a little bit more time consuming than your typical muffin recipe, but they're definitely worth it! :D


Before I go, I have a few questions for ya'll.

What would you like to see more of on the blog? 
Do ya'll like my recipes and workouts, or do you want to see what I do with the rest of my time? Should I do some more Vlogs? If ya'll have any questions for me about anything, leave them in the comments and I'll do a Q&A vlog or something! :D 

What is your favorite thing to bake?
Breakfast-y stuff for me! :D

See ya'll later!!